ESPHome tutorial: DHT22 temperature and humidity sensor with an ESP32
My garage has no thermometer, and I never know if it freezes in there. A wired DHT22 is the cheapest way to fix that: three wires, ten lines of YAML, and the ESP32 sends the temperature and humidity to your network every 30 seconds.
What you need
- An ESP32 DevKit: ESP32 DevKit (the 3-pack is handy if you want one per room), or the ESP32-S3 N16R8.
- A DHT22 sensor (also sold as AM2302). A module with 3 pins is easiest.
- 3 jumper wires and a USB data cable.
DHT22 or DHT11?
The DHT11 is cheaper but measures whole degrees with an accuracy of about 2 degrees and no negative temperatures. The DHT22 has 0.1 degree resolution, about 0.5 degree accuracy and works from -40 to 80 degrees. Buy the DHT22.
Wiring
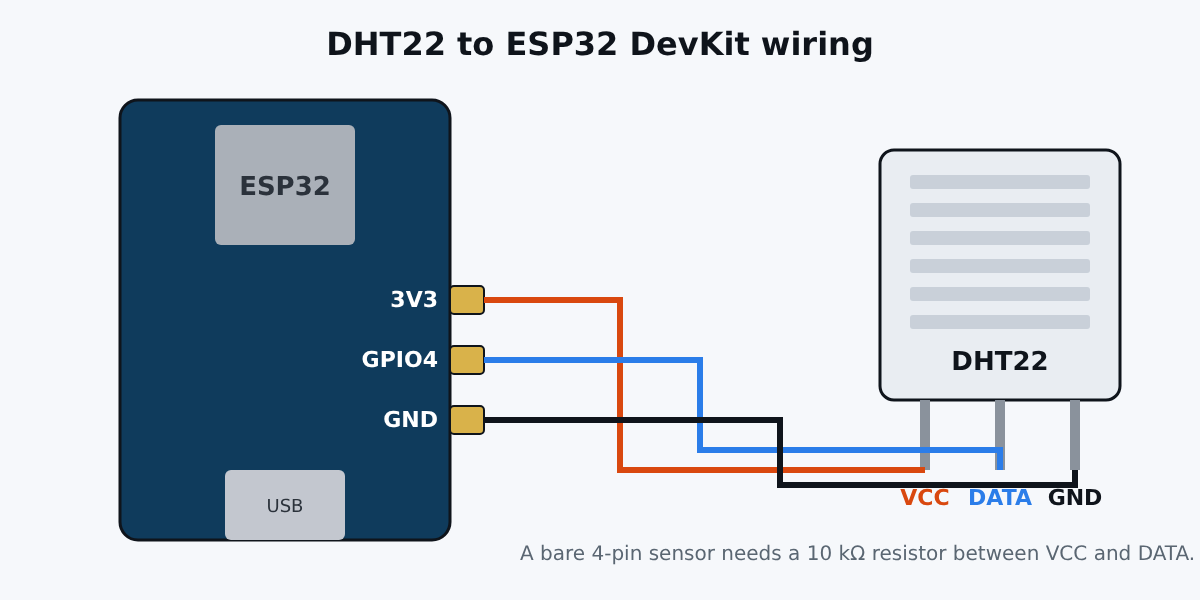
| DHT22 pin | ESP32 pin |
|---|---|
| VCC (+) | 3V3 |
| DATA (out) | GPIO4 |
| GND (-) | GND |
If your DHT22 has 4 pins (bare sensor), add a 10 kΩ resistor between VCC and DATA. This is the pull-up that lets the data line return to high. The 3-pin modules already have it on the board.
Power it from 3V3, not 5V: the ESP32 pins are 3.3 V only.
The configuration
Create garage.yaml:
esphome:
  name: garage

esp32:
  board: esp32dev

wifi:
  ssid: !secret wifi_ssid
  password: !secret wifi_password

logger:

api:
  encryption:
    key: !secret api_key

ota:
  - platform: esphome
    password: !secret ota_password

web_server:
  port: 80

sensor:
  - platform: dht
    pin: GPIO4
    model: DHT22
    update_interval: 30s
    temperature:
      name: "Garage temperature"
      filters:
        - offset: -0.5
    humidity:
      name: "Garage humidity"
  - platform: wifi_signal
    name: "Garage Wi-Fi signal"
    update_interval: 60s
Three things to know:
update_interval: 30s: the DHT22 cannot be read faster than every 2 seconds. 30 seconds is plenty for a room.offset: -0.5: a calibration filter. Compare with a reference thermometer, then correct the difference here. Many DHT22 read a little high.wifi_signal: handy to know if the ESP32 is too far from your router.
Keep the same secrets.yaml as in the Mijia tutorial.
Flash it
docker run --rm -p 6052:6052 -v "$PWD/config":/config esphome/esphomeOpen http://localhost:6052, add the file, click Install, then Plug into this computer. The first build takes a few minutes. When the logs show temperature and humidity lines, you are done.
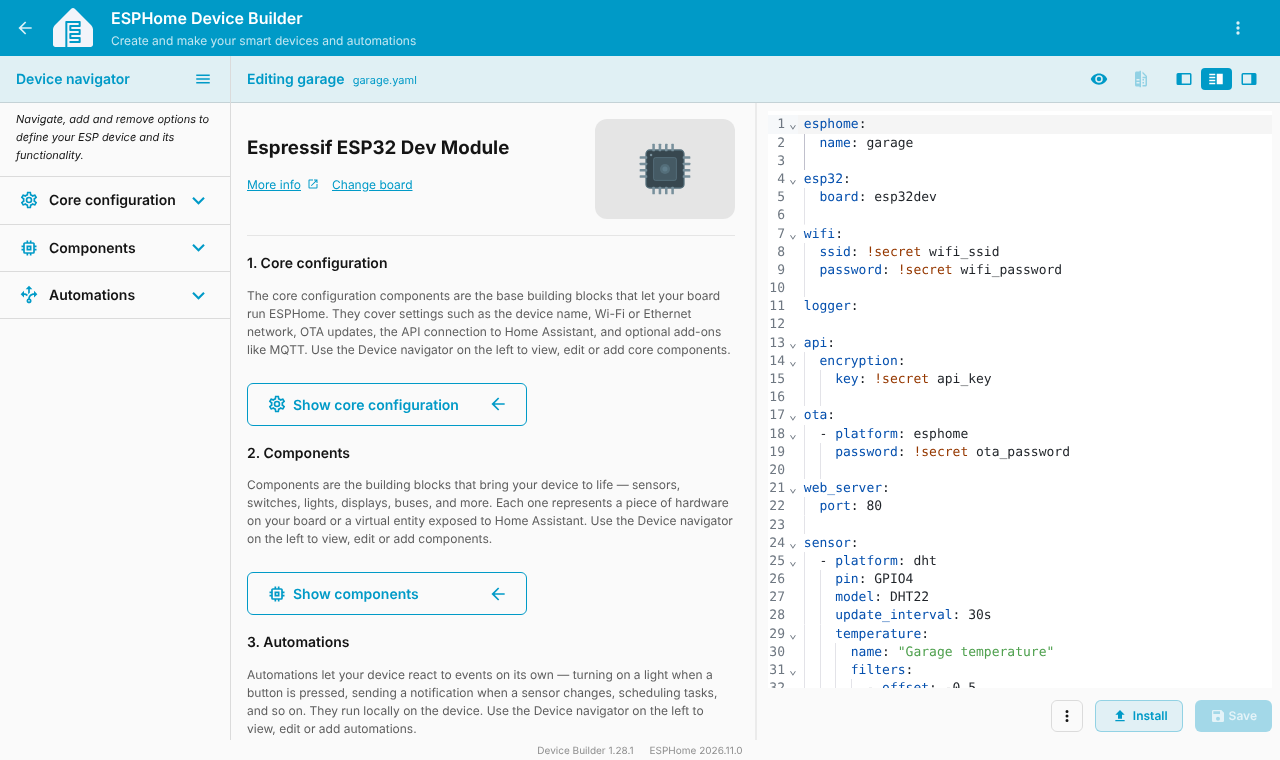
Next updates can be sent wirelessly. The values are also on http://garage.local.
Home Assistant
The device appears in Settings, Devices and services. Accept it, enter the API key, and you get temperature, humidity and signal entities. Add a card, or create an automation such as "notify me under 2 degrees in the garage".
If it does not work
Invalid readingsorNaN: check the wiring first, then the pull-up resistor. A wrong pin number is the other usual cause.- Random failures: keep the wires short (under 20 cm) or use a better power source.
- Wrong values after boot: the DHT22 needs a second or two to wake up. ESPHome retries by itself.
- Avoid pins that matter at boot: GPIO4 is a safe choice on the ESP32 DevKit.
Conclusion
A DHT22 and an ESP32 give you a cheap, wired monitor you can put anywhere there is Wi-Fi: garage, cellar, greenhouse, server cabinet. If you prefer wireless sensors with no soldering, see the Xiaomi Mijia tutorial.
This configuration was validated with esphome config. Wiring and calibration depend on your sensor, so test with a reference thermometer.